|
A form is a type of a database object that is primarily used to enter or display data in a database. You can also use a form as a switchboard that opens other forms and reports in the database, or as a custom dialog box that accepts user input and carries out an action based on the input.
To Create Form with Form Wizard: |
|
- Select Forms under Objects
- Click New on the 'database window toolbar'
- Double click on Form Wizard
- Select Employee table from Tables/Queries list
- Select fields from Available Fields: to Selected Fields:
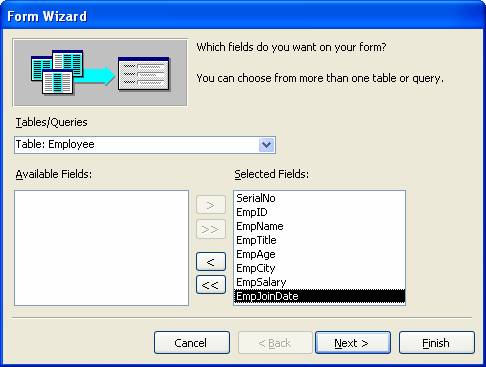 > Click Next button > Click Next button
- Select Layout > Click Next button
- Select Style > Click Next button
- Type a form name and click Finish button
To Create Form with Form Wizard: |
|
- Select Forms under Objects
- Click New on the 'database window toolbar'
- Double click on Form Wizard
- Select NewEmployee table (or your choice) from Tables/Queries list
- Select fields from Available Fields: to Selected Fields:
- Click Next button
- Select Layout > Click Next button
- Select Style > Click Next button
- Type a form name > Click Finish button
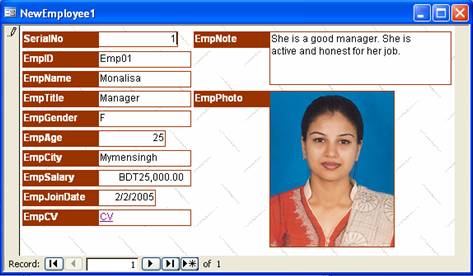
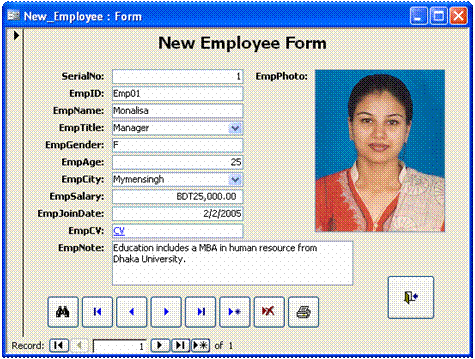
- Then type data
- For Hyperlink (EmpCV) field just type a data > On the Insert menu, click Hyperlink > Select Location > Select a .doc or any file > Click Ok button
- For OLE Object (EmpPhoto) field – Open Photoshop > Open a new image with Width: 1.57 inches, Height: 1.97 inches, Regulation: 300 pixels/inch and Color Mode: RGB > Open the picture file > Press 'Ctrl + A' for select the picture > Press 'Ctrl + C' for copy the picture > Select the new image > Press 'Ctrl + V' for paste the picture > Resize the picture if resize is needed > After resize picture press Enter > Press 'Ctrl + A' for select the picture > Press 'Ctrl + C' for copy the picture > Minimize Photoshop > Right click on OLE Object (EmpPhoto) field > Click Properties > Set Width: 1.57 (if any message is appeared, click ok), Height: 1.97 (if any message is appeared, click ok) and Size Mode: Stretch (if any message is appeared, click ok) > Close Properties box > Again right click on OLE Object (EmpPhoto) field > Click Insert Object… > Select Bitmap Image > Click Ok > Press 'Ctrl + V' for paste the picture > Click on the form outside of OLE Object (EmpPhoto) field
- For add new record click
- After finish entry close the form
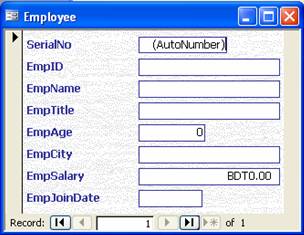
To Change Format Design of Form: |
|
- Select Forms under Objects
- Select the NewEmployee form
- Click Design on the 'database window toolbar'
- On the Format menu, click AutoFormat…
- Select a design from 'Form AutoFormat:' list > Click Ok button
- Save the form > Close the form
To Create Form with Auto Form: Columnar: |
|
- Select Forms under Objects
- Click New on the 'database window toolbar'
- Select Auto Form: Columnar > Choose a table/query: Employee (or your choose) > Click Ok
- Save the form with a unique name and close the form
To Create Form with Auto Form: Tabular: |
|
- Select Forms under Objects
- Click New on the 'database window toolbar'
- Select Auto Form: Tabular > Choose a table/query: Employee (or your choose) > Click Ok
- Save the form with a unique name and close the form
To Create Form with Auto Form: Datasheet: |
|
- Select Forms under Objects
- Click New on the 'database window toolbar'
- Select Auto Form: Datasheet > Choose a table/query: Employee (or your choose) > Click Ok
- Save the form with a unique name and close the form
- Select Forms under Objects
- Click New on the 'database window toolbar'
- Double click on Form Wizard
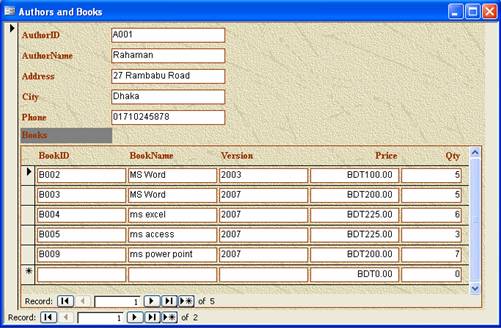
- Select Authors table (or your choice) from Tables/Queries list > Select all fields from Available Fields: to Selected Fields: > Select Books table (or your choice) from Tables/Queries list > Select all fields without AuthorID field from Available Fields: to Selected Fields: > Click Next button
- Click Next button
- Select Tabular (or your choose) layout > Click Next button
- Select a Style > Click Next button
- Type the title of Form: Author and Books and Subform: Books Subform or change the names, and Click Finish
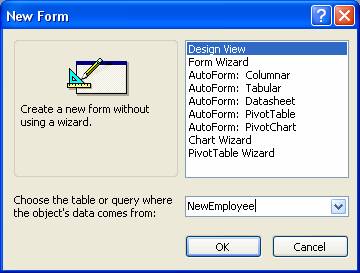
| To Create Form with Design View: |
|
- Select Forms under Objects
- Click New on the 'database window toolbar'
- Select Design View > Choose a table/query: NewEmployee (or your choose) > Click Ok
- Double click on the field list 'title bar' for select all fields of NewEmployee table
- Drag the fields from field (NewEmployee) list on the Detail area of form design grid > Then arrange and resize as you choose
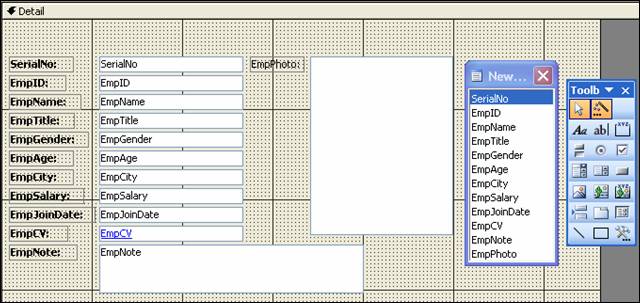
- Select Label tool from Toolbox > Click on the form and type 'New Employee Form'
[if Toolbox does not appear, on the View menu, click Toolbox]
- Select EmpTitle field from the form design grid and delete it
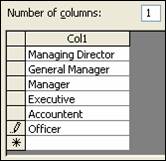
- Select Combo Box from Toolbox > Click on the form design grid > (You will get a dialog box) Select 'I will type in the values that I want' > Then type some title, like below –
 > Click Next button > Select EmpTitle for 'Store that value in this field:' > Click Next button > Type label name: EmpTitle > Click Finish button > Click Next button > Select EmpTitle for 'Store that value in this field:' > Click Next button > Type label name: EmpTitle > Click Finish button
- Replace the new Combo Box to that place
- Follow the previous Combo Box process for EmpCity field
- Select Command button from Toolbox > Click on the form design grid > Select Categories: Record Navigation and Actions: Find Record > Click Next button > Click Next button > Click Finish button
- By this way add Actions: Go To First Record, Go To Last Record, Go To Next Record, Go To Previous Record from Categories: Record Navigation > Add Actions: Add New Record, Delete Record, and Print Record from Categories: Record Operations > Add Actions: Close Form from Categories: Form Operations
- Arrange the command/action buttons
- Save the form and close form
- Open the form to entry data
| To Change Fill/Back Color of Form/Field: |
|
- Select Forms under Objects
- Select the NewEmployee form (or your choose) from 'database window'
- Click Design on the 'database window toolbar'
- Right click on the form design grid or field > Point to Fill/Back Color > Select a color
- Save the form and close the form
| To Change Font Color of Field: |
|
- Select Forms under Objects
- Select the NewEmployee form (or your choose) [from database window]
- Click Design on the 'database window toolbar'
- Right click on the field > Point to Font Color > Select a color
- Save the form and close the form
| To Create Calculate Form: (Practice) |
|
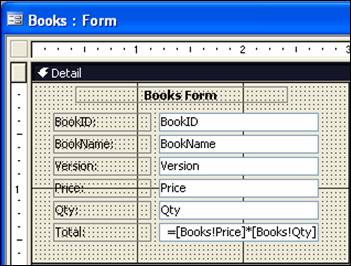
- Select Forms under Objects
- Select Design View > Select a table/query: Books (or your choose) > Click Ok button
- Select fields and drag on the form design grid
- Select Text tool from Toolbox > Click on the form design grid > Right click on the text box > Click Properties > Click on Control Source > Click on the Toggle button > Type the expression: =[Books!Price]*[Books!Qty]
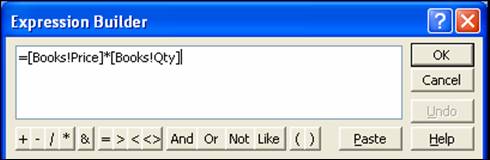 > Click Ok button > Close Properties box > Click Ok button > Close Properties box
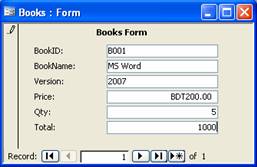
- Seve the form > Close the form design window > Open the form and look the calculation
| To Create Form with Design View: |
|
- Select Forms under Objects
- Click New on the 'database window toolbar'
- Select Design View > Choose a table/query: NewEmployee (or your choose) > Click Ok button
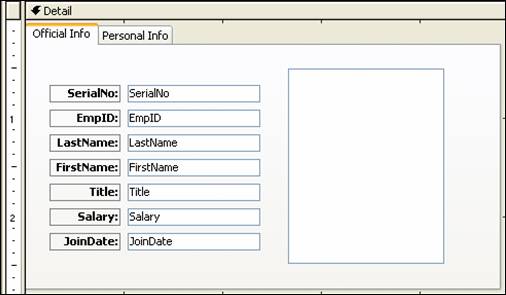
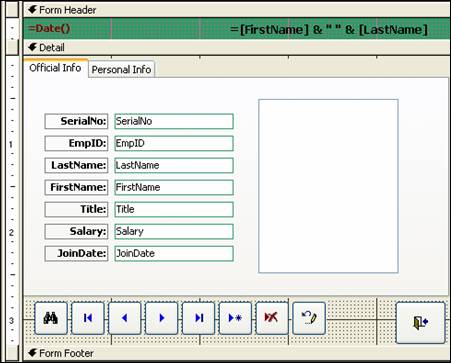
- Select Tab Control from Toolbox and click on the form design grid
- Right click on first tab (Page1) > Click Properties > Click in the Name field and type Official Info (or your choose) > Close the properties box
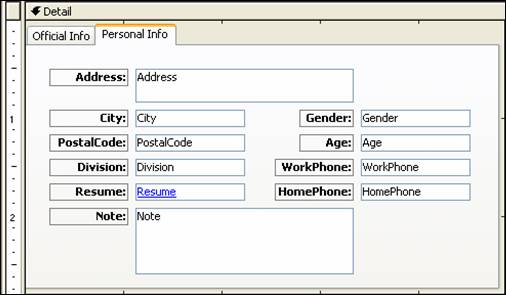
- Right click on second tab (Page2) > Click Properties > Click in the Name field and type Personal Info (or your choose) > Close the properties box
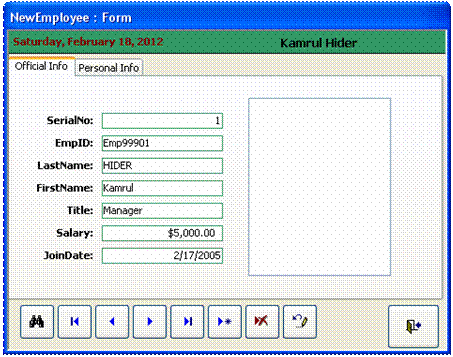
- Select 'Official Info' tab and set fields (SerialNo, EmpID, LastName, FirstName, Title, Gender, Age, WorkPhone, Salary, JoinDate) on the page, like below –
- Select 'Personal Info' tab and set fields on the page, like below –
- Add and arrange buttons on form detail area
- Right click on form > Click Properties > Select Form and set Record Selectors: No, Navigation Buttons: No, Auto Center: Yes, Control Box: No, Moveable: No > Close the properties box
- On the View menu, Click Form Header/Footer
- Select Text Box tool from Toolbox > Click on Form Header/Footer area > Right click on Text Box > Click in the Control Source field and type =[FirstName] & " " & [LastName] and set Enabled: No, Locked: Yes > Close properties box > Delete Text Box label
- On the Insert menu, click Date and Time… > Deselect Include Time > Click Ok button
- Save the form with a unique name > Close the 'design view' window
- Open the form
|

