| To Create Table with Datasheet View: |
|
Datasheet View: Datasheet View is used to easily create a table, but we can not set data type, field properties, and primary key at design time.
- Select Tables under Objects
- Click New on the 'database window toolbar'
- Select Datasheet View > Click Ok button
- Double Click on Field1 and Type a Field Name, like – FirstName
- Double Click on Field2 and Type a Field Name, like – LastName
- Double Click on Field3 and Type a Field Name, like – Title
- Double Click on Field4 and Type a Field Name, like – Age
- Double Click on Field5 and Type a Field Name, like – City
- Double Click on Field6 and Type a Field Name, like – Phone
- On the File menu, click Save
- Type Table Name: Employee/Author/Officer (or your choose) > Click Ok button
- [Read the message carefully] > Click Yes/No button
- Close the window
Note: If you click yes Access will create a primary key field (ID) and if you click no Access will not create primary key field. So if you want to look the difference create two tables with yes and no.
Primary key: One or more fields (columns) whose value or values uniquely identify each record in a table.
Properties of Primary key:
- A primary key cannot allow Null values and must always have a unique index.
- A primary key is used to relate a table to foreign keys in other tables.
- Select Tables under Objects
- Select the table
- Click Open on the 'database window toolbar'
- or
- Select Tables under Objects
- Double click on the table
- or
- Select Tables under Objects
- Right click on the table and click Open
- Select Tables under Objects
- Right click on the table > Click Delete > Click Yes button
- Select Tables under Objects
- Right click on the table > Click Rename > Type a new name > Press Enter
The characteristic of a field that determines what type of data it can store. For example, a field whose data type is Text can store data consisting of either text or number characters, but a Number field can store only numerical data.
Field data types available in Access (MDB)
Note: The information in this topic applies only to a Microsoft Access database (.mdb). The following list summarizes all the field data types available in Microsoft Access, their uses, and their storage sizes.
Text : Use for text or combinations of text and numbers, such as addresses, or for numbers that do not require calculations, such as phone numbers, part numbers, or postal codes. Stores: up to 255 characters. The FieldSize property controls the maximum number of characters that can be entered.
Memo: Use for lengthy text and numbers, such as notes or descriptions. Stores: up to 65,536 characters.
Number: Use for data to be included in mathematical calculations, except calculations involving money (use Currency type). Stores: 1, 2, 4, or 8 bytes; stores 16 bytes for Replication ID (GUID). The FieldSize property defines the specific Number type.
Date/Time: Use for dates and times. Stores: 8 bytes.
Currency: Use for currency values and to prevent rounding off during calculations. Stores: 8 bytes.
AutoNumber: Use for unique sequential (incrementing by 1) or random numbers that are automatically inserted when a record is added. Stores: 4 bytes; stores 16 bytes for Replication ID (GUID).
Yes/No: Use for data that can be only one of two possible values, such as Yes/No, True/False, On/Off. Null values are not allowed. Stores: 1 bit.
OLE Object: Use for OLE objects (such as Microsoft Word documents, Microsoft Excel spreadsheets, pictures, sounds, or other binary data) that were created in other programs using the OLE protocol. Stores: up to 1 gigabyte (limited by disk space).
Hyperlink: Use for hyperlinks. A hyperlink can be a UNC path or a URL. Stores: up to 64,000 characters.
Lookup Wizard: Use to create a field that allows you to choose a value from another table or from a list of values using a combo box— -choosing this option in the data type list starts a wizard to define this for you.
Requires the same storage size as the primary key that corresponds to the Lookup field— -typically 4 bytes.
| To Create Table with Design View: (Process - 1) |
|
- Select Tables under Objects
- Click New on the 'database window toolbar'
- Select Design View > Click OK button
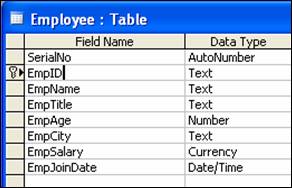
- Field Name – SerialNo and Data Type – Autonumber
- Field Name – EmpID and Data Type – Text
- Field Name – EmpName and Data Type – Text
- Field Name – EmpTitle and Data Type – Text
- Field Name – EmpAge and Data Type – Number
- Field Name – EmpCity and Data Type – Text
- Field Name – EmpSalary and Data Type – Currency
- Field Name – EmpJoinDate and Data Type – Date/Time
- Right click on EmpID and click Primary Key
- On the File menu, click Save
- Type a unique Table Name: Employee (or your choose) > Click Ok button
- Close the 'design view' window
- Then, if you want to entry data into the Employee table, open the table and entry data. After entry data close the table.
To Create Table with Design View: (Process – 2)
- Select Tables under Objects
- Double click on the Create table in Design view from 'database window'
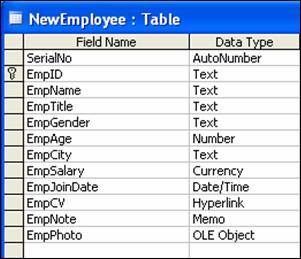
- Field Name – SerialNo and Data Type – Autonumber
- Field Name – EmpID and Data Type – Text
- Field Name – EmpName and Data Type – Text
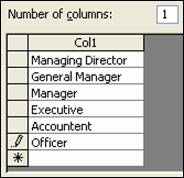
- Field Name – EmpTitle and Data Type – Lookup Wizerd… (You will get a dialog box.)
Select 'I will type in the values that I want'
Then type some title, like below –
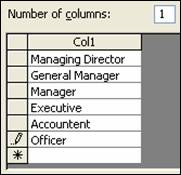 > Click Next button > Click Finish button > Click Next button > Click Finish button
- Field Name – EmpGender and Data Type – Text
- Field Name – EmpAge and Data Type – Number
- Field Name – EmpCity and Data Type – Lookup Wizard… (Follow previous process for city name)
- Field Name – EmpSalary and Data Type – Currency
- Field Name – EmpJoinDate and Data Type – Date/Time
- Field Name – EmpCV and Data Type – Hyperlink
- Field Name – EmpNote and Data Type – Memo
- Field Name – EmpPhoto and Data Type – OLE Object
- Right click on EmpID and click Primary Key
- Save the table with a unique name, as – NewEmployee (Note: If you type same/previous table name and at saving time click 'Yes', you will lose your previous table.)
- Close the 'design view' window
- Then, if you want to entry data into the NewEmployee table, open the table and enter data. After entry data close the table.
- Select Tables under Objects
- Select the table NewEmployee (or your choose)
- Click Design on the 'database window toolbar'
- Then Change the design (field name or data type)
- On the File menu, click Save
- Close the 'design view' window
| To Create Table using Field Properties with Design View: |
|
- Select Tables under Objects
- Double click on the Create table in Design view
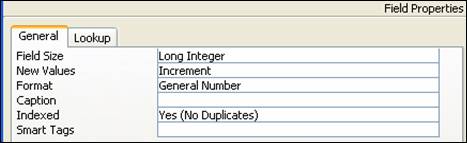
- Field Name – SerialNo, Data Type – AutoNumber and Field Properties – Format: General Number, Indexed: Yes (No Duplicates)
- Field Name – EmpID, Data Type – Text and Field Properties – Field Size: 15, Caption: EmployeeID
- Field Name – EmpName, Data Type – Text and Field Properties – Field Size: 25, Format: >, Required: Yes, Allow Zero Length: No, Indexed: Yes (Duplicates OK)
- Field Name – EmpTitle, Data Type – Lookup Wizerd… (You will get a dialog box.)Select 'I will type in the values that I want'
Then type some title, like below –
 > Click Next button > Click Finish button and Field Properties – Field Size: 20, Default Value: Officer, Required: Yes, Allow Zero Length: No, Indexed: Yes (Duplicates OK) > Click Next button > Click Finish button and Field Properties – Field Size: 20, Default Value: Officer, Required: Yes, Allow Zero Length: No, Indexed: Yes (Duplicates OK)
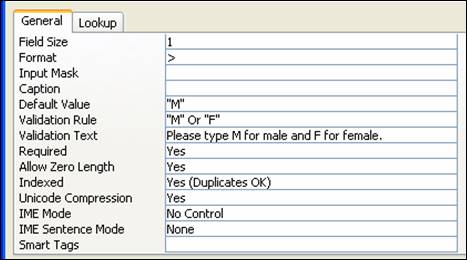
- Type Field Name – EmpGender, Data Type – Text and Field Properties: Field Size – 1, Format: >, Default Value: "M", Validation Rule: "M" Or "F", Validation Text: Please type M for male and F for female., Required: Yes, Indexed: Yes (Duplicate Ok)
- Field Name – EmpAge, Data Type – Number and Field Properties – Field Size: Byte, Format: General Number, Indexed: Yes (Duplicates OK)
- Field Name – EmpCity, Data Type – Lookup Wizard… (Follow previous process for city name.) and and Field Properties – Field Size: 20, Default Value: Mymensingh, Required: Yes, Indexed: Yes (Duplicates OK)
- Field Name – EmpSalary, Data Type – Currency and Field Properties – Indexed: Yes (Duplicates OK)
- Field Name – EmpJoinDate, Data Type – Date/Time and Field Properties – Format: Short Date, Input Mask: Click Toggle button > Yes > Select Short Date & Next> Next > Finish
- Field Name – EmpPhone, Data Type – Text and Field Properties – Field Size:13, Format: @@-@@@@@-@@@@@@, Required: Yes, Indexed: Yes (No Duplicates)

- Right Click on EmpID and click Primary Key
- Save the table with a unique name, as –NewEmployeeFP (Note: If you type same/previous table name and at saving time click 'Yes', you will lose your previous table.)
- Close the 'design view' window
- Then, if you want to entry data into the NewEmployee table, open the table and enter data. After entry data close the table.
- Select Tables under Objects
- Select the table NewEmployee (or your choose)
- Click Design on the 'database window toolbar'
- Then Change the design (field name or data type)
- On the File menu, click Save
- Close the 'design view' window
FieldSize Property: We can use the FieldSize property to set the maximum size for data stored in a field set to the Text, Number, or AutoNumber data type. We should use the smallest possible FieldSize property setting because smaller data sizes can be processed faster and require less memory.
Setting
- If the DataType property is set to Text, enter a number from 0 to 255. The default setting is 50.
- If the DataType property is set to AutoNumber, the FieldSize property can be set to Long Integer or Replication ID.
- If the DataType property is set to Number, the FieldSize property settings and their values are related in the following way.
| Setting |
Description |
Decimal precision |
Storage size |
Byte |
Stores numbers from 0 to 255 (no fractions). |
None |
1 byte |
Decimal |
Stores numbers from –10^38–1 through 10^38–1 (.adp)
Stores numbers from –10^28–1 through 10^28–1 (.mdb) |
28 |
12bytes |
Integer |
Stores numbers from –32,768 to 32,767 (no fractions). |
None |
2 bytes |
Long Integer |
(Default) Stores numbers from –2,147,483,648 to 2,147,483,647 (no fractions). |
None |
4 bytes |
Single |
Stores numbers from
–3.402823E38 to –1.401298E–45
for negative values and from
1.401298E–45 to 3.402823E38 for positive values. |
7 |
4 bytes |
Double |
Stores numbers from
–1.79769313486231E308 to
–4.94065645841247E–324
for negative values and from
4.94065645841247E–324 to
1.79769313486231E308 for positive values. |
15 |
8 bytes |
Replication ID |
Globally unique identifier (GUID) |
N/A |
16 bytes |
Format Property: We can use the Format property to customize the way numbers, dates, times, and text are displayed and printed. You can use one of the predefined formats or you can create a custom format by using formatting symbols. The Format property uses different settings for different data types. The Format property affects only how data is displayed. It doesn't affect how data is stored. For information about settings for a specific data type, see one of the following topics:
Format Property - Date/Time Data Type
The following table shows the predefined Format property settings for the Date/Time data type.
| Setting |
Description |
General Date |
(Default) If the value is a date only, no time is displayed; if the value is a time only, no date is displayed. This setting is a combination of the Short Date and Long Time settings.
Examples: 4/3/93, 05:34:00 PM, and 4/3/93 05:34:00 PM. |
Long Date |
Same as the Long Date setting in the regional settings of Windows.
Example: Saturday, April 3, 1993. |
Medium Date |
Example: 3-Apr-93. |
Short Date |
Same as the Short Date setting in the regional settings of Windows.
Example: 4/3/93.
Warning The Short Date setting assumes that dates between 1/1/00 and 12/31/29 are twenty-first century dates (that is, the years are assumed to be 2000 to 2029). Dates between 1/1/30 and 12/31/99 are assumed to be twentieth century dates (that is, the years are assumed to be 1930 to 1999). |
Long Time |
Same as the setting on the Time tab in the regional settings of Windows.
Example: 5:34:23 PM. |
Medium Time |
Example: 5:34 PM. |
Short Time |
Example: 17:34. |
Format Property - Number and Currency Data Types
The following table shows the predefined Format property settings for numbers.
| Setting |
Description |
General Number |
(Default) Display the number as entered. |
Currency |
Use the thousand separator; follow the settings specified in the regional settings of Windows for negative amounts, decimal and currency symbols, and decimal places. |
Euro |
Use the euro symbol ( ), regardless of the currency symbol specified in the regional settings of Windows. |
Fixed |
Display at least one digit; follow the settings specified in the regional settings of Windows for negative amounts, decimal and currency symbols, and decimal places. |
Standard |
Use the thousand separator; follow the settings specified in the regional settings of Windows for negative amounts, decimal symbols, and decimal places. |
Percent |
Multiply the value by 100 and append a percent sign (%); follow the settings specified in the regional settings of Windows for negative amounts, decimal symbols, and decimal places. |
Scientific |
Use standard scientific notation. |
Format Property - Text and Memo Data Types
You can create custom text and memo formats by using the following symbols.
| Symbol |
Description |
@ |
Text character (either a character or a space) is required. |
& |
Text character is not required. |
< |
Force all characters to lowercase. |
> |
Force all characters to uppercase. |
The following are examples of text and memo custom formats.
| Setting |
Data |
Display |
@@@-@@-@@@@ |
465043799 |
465-04-3799 |
@@@@@@@@@ |
465-04-3799
465043799 |
465-04-3799
465043799 |
> |
davolio
DAVOLIO
Davolio |
DAVOLIO
DAVOLIO
DAVOLIO |
< |
davolio
DAVOLIO
Davolio |
davolio
davolio
davolio |
@;"Unknown" |
Null value |
Unknown |
|
Zero-length string |
Unknown |
|
Any text |
Same text as entered is displayed |
Note: Microsoft Access provides predefined formats for Date/Time, Number and Currency, Text and Memo, and Yes/No data types. The predefined formats depend on the country/region specified by double-clicking Regional Options in Windows Control Panel. Microsoft Access displays formats appropriate for the country/region selected. For example, with English (United States) selected on the General tab, 1234.56 in the Currency format appears as $1,234.56, but when English (British) is selected on the General tab, the number appears as £1,234.56.
If you set a field's Format property in table Design view, Microsoft Access uses that format to display data in datasheets. It also applies the field's Format property to new controls on forms and reports.
InputMask Property: We can use the InputMask property to make data entry easier and to control the values users can enter in a text box control. Input masks are helpful for data-entry operations such as an input mask for a Phone Number field that shows you exactly how to enter a new number: (___) ___-____.
Caption Property: We can use the Caption property to provide helpful information to the user through captions on objects in various views:
- Field captions specify the text for labels attached to controls created by dragging a field from the field list and serves as the column heading for the field in table or query Datasheet view.
- Form captions specify the text that appears in the title bar in Form view.
- Report captions specify the title of the report in Print Preview.
- Button and label captions specify the text that appears in the control.
DefaultValue Property: We can use DefaultValue property to specify a string value that is automatically entered in a field when a new record is created. For example, in an Addresses table you can set the default value for the City field to Mymensingh. When users add a record to the table, they can either accept this value or enter the name of a different city.
ValidationRule Property: We can use the ValidationRule property to specify requirements for data entered into a record, field, or control. When data is entered that violates the ValidationRule setting.
ValidationText Property: Use the ValidationText property to specify a message to be displayed to the user when data is entered that violates a ValidationRule setting for a record, field, or control.
Required Property: We can use the Required property to specify whether a value is required in a field. If this property is set to Yes, when you enter data in a record, you must enter a value in the field or in any control bound to the field, and the value cannot be Null. For example, you might want to be sure that a LastName control has a value for each record. When you want to permit Null values in a field, you must not only set the Required property to No but, if there is a ValidationRule property setting, it must also explicitly state "validationrule Or Is Null".
Note: The Required property doesn't apply to AutoNumber fields.
The Required property uses the following settings.
Setting |
Visual Basic |
Description |
Yes |
True (–1) |
The field requires a value. |
No |
False (0) |
(Default) The field doesn't require a value. |
AllowZeroLength Property: We can use the AllowZeroLength property to specify whether a zero-length string (" ") is a valid entry in a table field.
Note The AllowZeroLength property applies only to Text, Memo, and Hyperlink table fields.
The AllowZeroLength property uses the following settings.
Setting |
Visual Basic |
Description |
Yes |
True |
A zero-length string is a valid entry. |
No |
False |
(Default) A zero-length string is an invalid entry. |
Indexed Property: We can use the Indexed property to set a single-field index. An index speeds up queries on the indexed fields as well as sorting and grouping operations. For example, if you search for specific employee names in a LastName field, you can create an index for this field to speed up the search for a specific name.
The Indexed property uses the following settings.
Setting |
Description |
No |
(Default) No index. |
Yes (Duplicates OK) |
The index allows duplicates. |
Yes (No Duplicates) |
The index doesn't allow duplicates. |
Weak Entity/Table: An entity set may not have sufficient attributes/fields to from a primary key. Such an entity set is termed as weak set.
Strong Entity/Table: An entity set that has a primary key id termed as strong entity set.
| To Create Table with Table Wizard: |
|
- Select Tables under Objects
- Click New on the 'database window toolbar'
- Select Table Wizard > Click Ok button

- Choose a table category, Business or Personal > Choose a table, as – Products from Sample Tables: list > Add fields from Sample Fields: list to Fields in my new table: list > Click Next button and you will get below wizard–
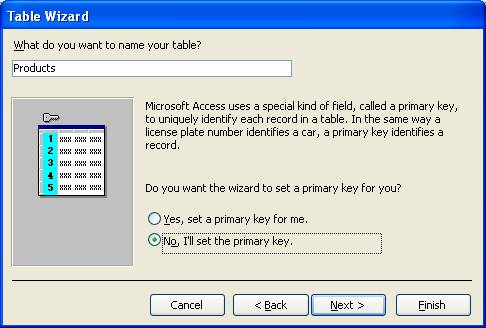
- Type a table name and choose 'No, I'll set the primary key.'
[Note: If you choose 'Yes, set a primary key for me.' wizard will set primary key field for the table with AutoNumber data type and if you choose 'No', I'll set the primary key.' You'll able to set the primary key field for the table.]
- Click Next button and you will get below wizard –
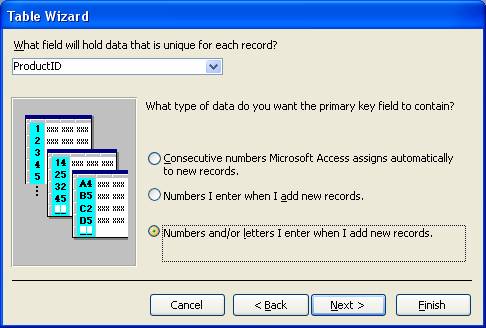
- What field will hold data that is unique for each record? ProductID is selected or you can choose another one but don’t need because ProductID is appropriate.
- What type of data do you want the primary key field to contain? First option mention primary key field's data type will AutoNumber, second option mention primary key field's data type will Number, and third option mention primary key field's data type will Text.
So select as you choose.
[Note: use all 3 options for practice purpose.]
- Click Next button and you will get below wizard –
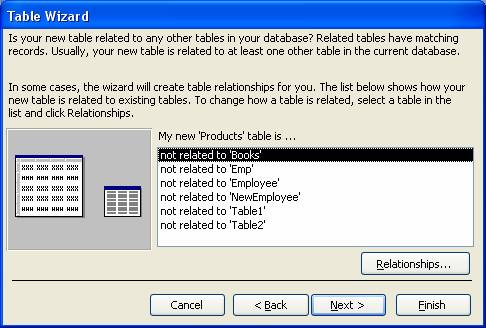
[Note: This wizard help you for relation to any other table, but in this case you have to follow the rules of relation.]
- Click Next button and you will get below wizard–
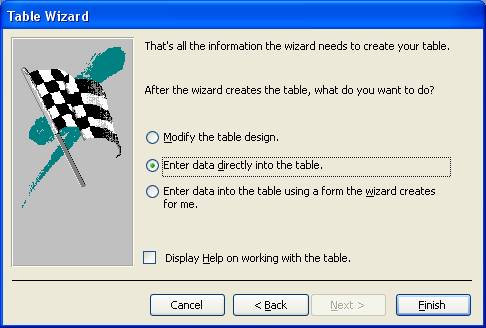
After the wizard creates the table, what do you want to do? First option mention you will able to change table design (field name, data type, description, and field properties), second option mention you'll able enter data into the table, and third option mention you will able to create form to enter data into the table.
[Note: use all 3 options for practice purpose.]
- Select 'Enter data directly into the field.' and click Finish
To Select Record:
- Open a table (employee or your choose)
- Which record you want to select, set cursor it's any cell
- On the Edit menu, click Select Record
To Delete Record:
- Open a table (employee or your choose)
- Which record you want to delete, set cursor it's any cell
- On the Edit menu, click Delete Record
- Click Yes button
To Select All Records:
- Open a table (employee or your choose)
- Set cursor into any cell
- On the Edit menu, click Select All Records
To Delete Column:
- Open a table (employee or your choose)
- Which column you want to delete, set cursor it's any cell
- On the Edit menu, click Delete Column
- Click Yes button
To Find Data: (Process 1)
- Open a table (employee or your choose)
- Which column's data you want to find, set cursor it's any cell
- On the Edit menu, click Find
- Type data/value into 'Find What:' box > Click Find Next button
To Find Data: (Process 2)
- Open a table (employee or your choose)
- On the Edit menu, click Find
- Type data/value into 'Find What:' box > Set Look In: Employee: Table or your choose > Set Match: Any Part of Field/Whole Field/Start of Field what you want > Select Match Case if you want > Click Find Next button
To Replace Data: (Process 1)
- Open a table (employee or your choose)
- Which column's data you want to replace, set cursor it's any cell
- On the Edit menu, click Replace
- Type old data/value into 'Find What:' box > Type new data/value into 'Replace With:' box > Click Find Next button > Click Replace/Replace All button
To Replace Data: (Process 2)
- Open a table (employee or your choose)
- On the Edit menu, click Replace
- Type old data/value into 'Find What:' box > Type new data/value into 'Replace With:' box > Set Look In: Employee: Table or your choose > Set Match: Any Part of Field/Whole Field/Start of Field what you want > Select Match Case if you want > Click Find Next button > Click Replace/Replace All button
To Format Font:
- Open a table (employee or your choose)
- On the Format menu, click Font…
- Change Font, Font style, Size, or Color what you want > Click Ok button
To Format Datasheet:
- Open a table (employee or your choose)
- On the Format menu, click Datasheet…
- Change Cell Effect, Background Color, etc. as you choose > Click Ok button
To Format Row Height:
- Open a table (employee or your choose)
- On the Format menu, click Row Height…
- Change Row Height: value as you choose > Click Ok button
To Format Column Width:
- Open a table (employee or your choose)
- On the Format menu, click Column Width…
- Change Column Width: value as you choose > Click Ok button
To Rename Column:
- Open a table (employee or your choose)
- Select column which you want to rename
- On the Format menu, click Rename Column
- Type a new name > Press Enter
To Hide Column:
- Open a table (employee or your choose)
- Select column which you want to hide
- On the Format menu, click Hide Columns
To Unhide Columns:
- Open a table (employee or your choose)
- On the Format menu, click Unhide Columns…
- Select Column > Click Ok button
To Freeze Column:
- Open a table (employee or your choose)
- Select column which you want to freeze
- On the Format menu, click Freeze Columns
To Unfreeze Column:
- Open a table (employee or your choose)
- Select column which you want to unfreeze
- On the Format menu, click Unfreeze Columns
To Filter Records:
- Open a table (employee or your choose)
- Which record you want to filter, set cursor it's any cell, as – EmpCity column which is contain Dhaka or your choose
- On the Records menu, point to Filter and click Filter by Selection
To Remove Filter:
- On the Records menu,
- Click Remove Filter/Sort
To Sort Records as Ascending Order:
- Open a table (employee or your choose)
- Which record you want to sort, set cursor it's any cell
- On the Records menu, point to Sort and click Sort Ascending
To Sort Records as Descending Order:
- Open a table (employee or your choose)
- Which record you want to sort, set cursor it's any cell
- On the Records menu, point to Sort and click Sort Descending
|
 Custom Search